
Silk Press on Natural Hair: The Honest 9-Step At-Home Guide (2026)
 Maya Thompson
📅 September 29, 2026
⏱ 14 min read
Silk Press on Natural Hair: The Honest 9-Step At-Home Guide (2026)
A silk press on natural hair is the closest thing to a salon blowout you can do at home: no chemicals, no relaxer — just careful washing, thorough blow-drying, and precise flat-iron work that turns coily texture temporarily sleek, shiny, and swingy. Done right, it lasts one to two weeks and your curls bounce back on the next wash day. Done carelessly, it’s one of the fastest ways to heat-damage natural hair.
This is the honest, research-based guide: what a silk press actually is (and isn’t), the real heat-damage science most tutorials skip, exact temperature ranges by hair texture, the full 9-step process with the professional “chase method,” how to make it last, and what to do when things go wrong. No miracle claims — just technique.
What Is a Silk Press, Exactly?
A silk press is a heat-styling technique — not a product, not a chemical treatment. The name describes the result: hair so smooth and lightweight it moves like silk. The process is always the same three phases: deep cleanse and condition, complete blow-dry, then flat-iron in small sections with a heat protectant.
People confuse it with several neighboring techniques. Here’s how they actually differ:
| Technique | What it is | Chemicals? | How long it lasts | Damage risk |
|---|---|---|---|---|
| Silk press | Blow-dry + careful flat-iron, heat protectant throughout | No | 1–2 weeks | Low–moderate (technique-dependent) |
| Regular flat-iron / “pressing” | Flat iron on hair that may not be fully prepped | No | Days–1 week | Moderate–high (often skipped prep steps) |
| Relaxer | Chemical that permanently breaks bonds to straighten | Yes | Permanent (grows out) | High — irreversible structural change |
| Keratin / Brazilian treatment | Chemical smoothing coating sealed in with heat | Yes (formaldehyde or derivatives in many formulas) | 2–5 months | Moderate — plus chemical exposure concerns |
| Dominican blowout | Roller set + high-heat blow-dry, often very hot | No | 1–2 weeks | Moderate–high (very high heat, fast work) |
The honest distinction: a silk press isn’t magic — it’s just flat-ironing done with full preparation (clarified, conditioned, 100% dry, protected, sectioned). The prep is what makes it silkier and less damaging than a rushed flat-iron session, not a secret product.
Will a Silk Press Damage My Natural Hair? The Honest Science
Let’s answer the question everyone actually has, straight: heat can damage natural hair, and a silk press uses significant heat. Whether yours gets damaged depends almost entirely on technique and frequency — not luck.
Here’s what heat does at the structural level, in plain English:
- Water turns to steam inside the shaft. This is the big one. If hair isn’t 100% dry before the flat iron touches it, trapped water flash-boils, blowing tiny bubbles through the hair’s inner structure (“bubble hair”). This is permanent damage from a single session — and it’s why “bone dry before ironing” is the most important rule on this page.
- Keratin denatures at extreme temperatures. Hair is mostly keratin protein. Sustained temperatures above roughly 450°F (230°C) start permanently altering that protein — the strand loses its ability to curl back. Multiple slow passes at lower heat do less damage than one scorching pass, but repeated high-heat sessions accumulate.
- The cuticle roughens. Even non-catastrophic heat lifts and chips the cuticle layer, which is why over-pressed hair looks dull and feels rough even when it’s “straight.”
The encouraging part, stated carefully: a single careful silk press — fully dried hair, real heat protectant, appropriate temperature, one pass per section — rarely causes visible lasting damage on healthy natural hair, and curls typically revert fully on the next wash. The damage stories come from the failure modes: ironing damp hair, max-temperature irons on fine hair, five passes per section, weekly pressing with no recovery time. A published review of hair cosmetics in the International Journal of Trichology describes how heat and cosmetic treatments interact with the hair shaft’s cuticle and cortex — worth a read if you want the deeper science.
Signs you’ve crossed the line into heat damage: sections that stay straight after washing (won’t revert), ends that look thin and see-through, hair that feels rough or “crunchy” when dry, and breakage concentrated in the straightened sections. Mild cases often recover with trims and a break from heat; severely denatured sections don’t revert — they have to grow out and be trimmed away. Honesty requires saying that plainly.
What You Need: Tools & Products Checklist
You don’t need a salon’s worth of gear, but each item below earns its place:
| Item | Why it matters | What to look for |
|---|---|---|
| Clarifying or deep-cleansing shampoo | Buildup blocks heat protectant and causes uneven results | A true clarifying formula; your sulfate-free shampoo for regular washes won’t cut through weeks of buildup |
| Deep conditioner (moisture + light protein) | Heat-stressed hair needs elasticity before the iron | A balanced mask — see our deep conditioner guide for 4c hair |
| Heat protectant | The single most important product in this process | Silicone-based sprays or serums rated to at least 450°F; applied to damp hair before blow-drying, then lightly again before ironing |
| Leave-in conditioner | Slip for detangling and blow-dry prep | Lightweight, water-based |
| Blow dryer with comb/nozzle attachment | Gets hair stretched and fully dry before ironing | Multiple heat settings; cool-shot button |
| Flat iron with adjustable temperature | Fixed-heat irons are a gamble on textured hair | Ceramic or titanium plates, digital temperature display, 1–1.5 inch width |
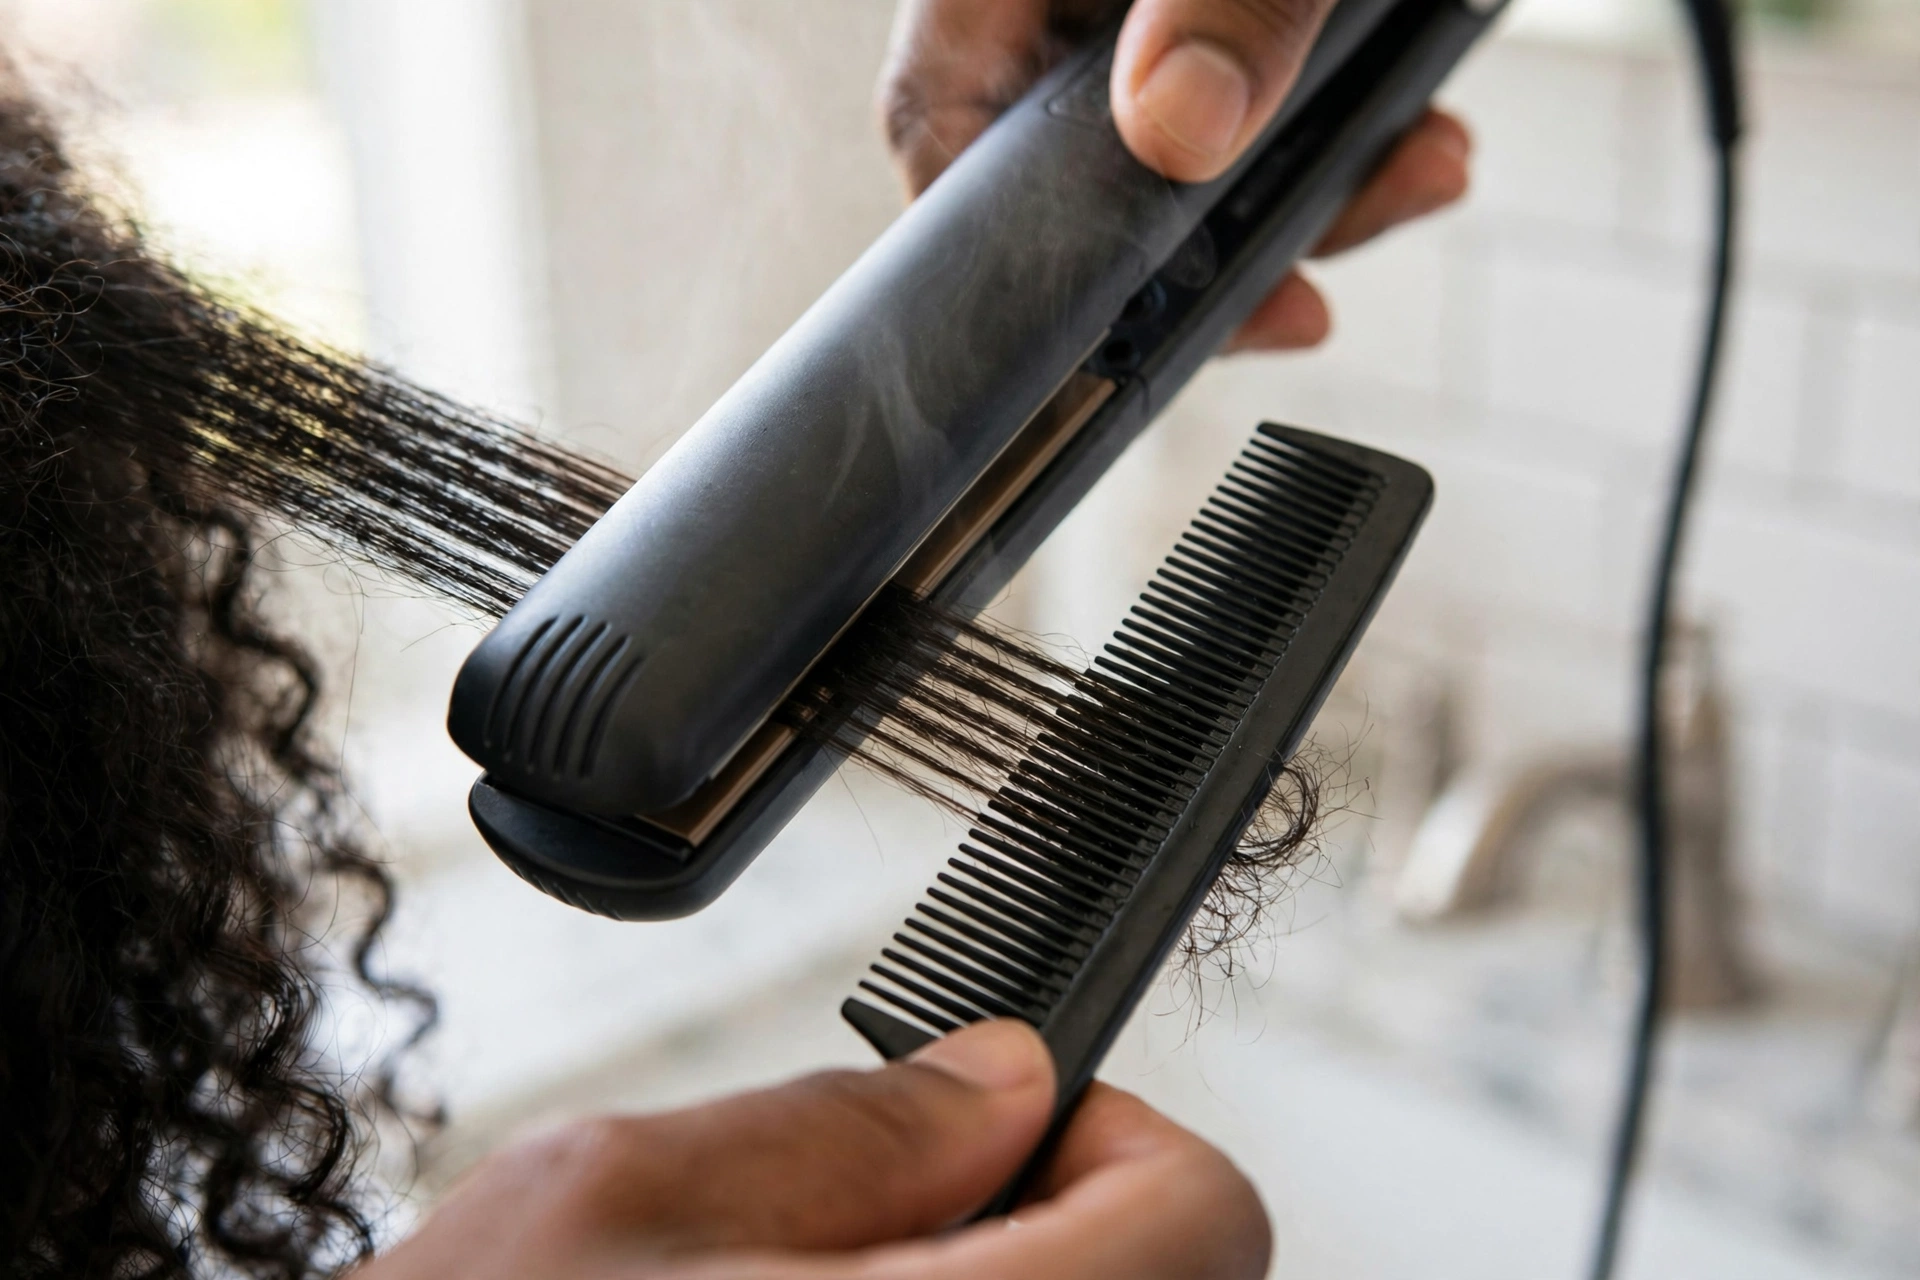
| Rat-tail comb (for the chase method) | Following the iron with the comb = one pass instead of three | Heat-resistant |
| Sectioning clips | Small sections are the whole game | Any sturdy clips |
| Lightweight serum or oil (finish) | Shine and frizz control after ironing | Light — heavy butters weigh silk-pressed hair down |
| Satin/silk scarf or bonnet | Night maintenance (see below) | Real satin or silk, not cotton |
The 9-Step Silk Press Process at Home
Budget 2–4 hours depending on density and length. Rushing is how damage happens.
Step 1: Clarify, Then Deep Condition
Start with a clarifying shampoo — two lathers — to strip silicones, butters, and hard-water minerals. Product film causes the iron to drag and heat unevenly. Follow immediately with a deep conditioner (15–30 minutes under a cap; gentle heat helps absorption). This isn’t optional pampering: moisturized, elastic hair survives heat dramatically better than dry, brittle hair. If your hair is color-treated or already fragile, lean toward a protein-containing mask this round.
Step 2: Trim Split Ends First
Pressing over split ends seals nothing — it just makes the splits more visible against sleek hair, and the heat travels up already-fractured shafts. Dust the ends before you press, on stretched hair so you can see what you’re cutting.
Step 3: Apply Leave-In and Heat Protectant to Damp Hair
On damp (not dripping) hair, work a lightweight leave-in through in sections for detangling slip, then apply heat protectant evenly — roots to ends, every section. Two honest notes: heat protectant reduces damage, it doesn’t make heat harmless; and most people under-apply it. If a section looks dry going into the dryer, it needed more.
Step 4: Blow-Dry 100% Dry in Sections (Tension Method)
Section into 4–8 parts. Blow-dry each section on medium heat, pulling the hair taut with a comb attachment or brush — the tension method. The goal isn’t just dryness, it’s stretch: the straighter the hair enters the flat-iron phase, the fewer iron passes it needs. Critical: hair must be bone-dry before ironing. Cool air feels room-temperature on fully dry hair; any cool or damp feeling means keep drying. Ironing damp hair causes the steam-blister damage described above — this is the step most at-home damage traces back to.
Step 5: Work in Small, Clean Sections
Re-section into 1/4- to 1/2-inch subsections for ironing — thinner than feels necessary. Thick sections force multiple passes (more total heat exposure); thin sections straighten in one pass. Clip everything else out of the way. This is tedious and it is also the entire difference between salon-smooth and puffy-by-noon.
Step 6: One Pass With the Chase Method
Set your temperature (guide below). Take one thin section, place the rat-tail comb at the roots behind the flat iron, and glide both down the section together in one slow, steady motion — the comb chases the iron. The comb keeps the hair taut and feeds it evenly through the plates, which is what delivers glassy results in a single pass. Do not stop mid-shaft, do not go back for “touch-ups” on the same section while it’s hot. One pass, move on.
Step 7: Use the Right Temperature for Your Texture
More heat is not “more sleek” — it’s just more damage. Match the iron to the hair:
| Hair texture / density | Suggested range | Notes |
|---|---|---|
| Fine, low-density, or color-treated | 300–350°F (150–175°C) | Start low; fine hair straightens easily and damages fastest |
| Medium texture / density | 350–400°F (175–200°C) | The sweet spot for most natural hair |
| Coarse, dense, resistant 4b/4c | 400–430°F (200–220°C) | Higher heat is sometimes genuinely needed — but only on fully prepped, protected, dry hair, one pass |
Honest caveat: these are starting ranges, not prescriptions. Test one hidden section first. If it straightens cleanly at 375°F, there is no reason to use 430°F. And no home iron needs to exceed ~450°F on natural hair — above that, you’re denaturing keratin for no cosmetic gain.
Step 8: Finish Light — Serum, Not Butter
Once every section is pressed and the hair has cooled, smooth a pea-sized amount of lightweight serum or oil over the surface for shine and frizz control. Heavy butters and thick oils weigh silk-pressed hair down, attract dust, and can literally smoke on freshly ironed hair. Less is more — you can always add another drop tomorrow.
Step 9: Let It Cool and Set Before Touching
Give the finished style 10–15 minutes to cool completely before styling, parting, or wrapping. Hair sets as it cools; manipulating it hot invites frizz and dents. Then style as desired — sleek and straight, or bumped ends with a single curling pass.
How to Maintain a Silk Press (Make It Last 1–2 Weeks)
A silk press dies from three things: moisture, friction, and sweat. Manage those and two weeks is realistic; ignore them and it’s puffy by day three.
- Wrap it every night. Brush the hair smooth, wrap it around your head (the classic “doobie” wrap), and cover with a silk or satin scarf. This is non-negotiable — cotton pillowcases create frizz overnight.
- Pin-curl alternative. If wrapping feels complicated, large pin curls under a satin bonnet preserve body and smoothness.
- Keep water away. Shower with a cap; steam is moisture. On humid days, a light anti-humidity serum on the outer layer helps.
- Workouts need a plan. Sweat at the roots reverts the hairline first. A sweat-wicking headband, keeping the hair up and off the neck, and a cool blow-dry of the roots afterward extends the style for active people.
- Don’t re-iron daily. Touch up only the hairline or nape if needed, on low heat, with protectant. Daily full re-ironing stacks heat damage fast.
- Know when it’s done. Around week two (sooner in humidity), roots revert and ends lose polish. Pushing a dying press with more heat just damages hair for diminishing returns — wash and start fresh, or wear a stretched style instead.

Silk Press at Home vs. Salon: Honest Cost Comparison
| At home (first time) | At home (ongoing) | Salon | |
|---|---|---|---|
| Cost | $80–$200 (iron + dryer + products, one-time) | $10–$20 in product per session | $60–$150+ per session (US average; higher in major cities) |
| Time | 2–4 hours (slower while learning) | 2–3 hours | 1.5–3 hours in the chair |
| Quality control | You control heat, passes, products | Improves with practice | Depends entirely on the stylist — ask about their temperature and pass count |
| Risk | Higher while learning (damp ironing, too-hot iron) | Low once technique is solid | Lower with a skilled natural-hair stylist; higher with a rushed one |
Honest take: if your hair is already damaged, very fine, or you’re nervous about heat, one salon visit with a stylist experienced in natural hair is worth it as a baseline — you can learn their sectioning and temperature choices and replicate at home later. Our broader product landscape for 4c hair is covered here: best products for 4c natural hair.
7 Common Silk Press Mistakes
- Ironing hair that isn’t fully dry — the #1 cause of at-home heat damage. Bone dry or don’t iron.
- Skipping heat protectant (or applying it to dry hair after the fact, where it can’t distribute).
- Max temperature “to get it straight in one pass” — especially on fine or color-treated hair.
- Sections too thick — forces 3–4 passes, which is more total heat than one pass at a slightly higher temp on a thin section.
- Pressing over buildup — the iron drags, heats unevenly, and the result looks dull by day two.
- Heavy oils and butters as “heat protectant” — kitchen oils aren’t formulated heat protectants; some smoke and fry the cuticle.
- Pressing too often — weekly pressing with no recovery weeks accumulates damage even with perfect technique. Every 6–8 weeks is a sustainable rhythm for most people.
Frequently Asked Questions
How long does a silk press last?
Honestly: 1–2 weeks with proper night maintenance (wrapping + silk scarf) and low humidity. In humid climates or with heavy workouts, expect 5–7 days. Anyone promising a month from a pure heat style is overselling — that longevity belongs to keratin treatments, not silk presses.
Will a silk press revert my curl pattern?
A careful, occasional silk press reverts fully on wash day for most people — that’s the entire point of the technique. Permanent loss of curl pattern is heat damage, not a normal outcome, and it comes from the failure modes above: damp ironing, excessive temperature, repeated passes, or pressing too frequently. If a section stays straight after a proper wash and condition, that section was damaged, not “trained.”
Can I do a silk press on 4c hair?
Yes — 4c hair takes beautifully to silk pressing, and it’s one of the best ways to check length and trim accurately. It typically needs the higher end of the temperature range (400–430°F) and smaller sections, which makes thorough prep and a real heat protectant even more important. The American Academy of Dermatology’s guidance for Black hair is a good companion read on gentle handling around heat styling.
What’s the difference between a silk press and just flat-ironing?
Technique and prep. A silk press is flat-ironing — but with full preparation (clarify, deep condition, complete blow-dry, heat protectant, small sections, chase method, one pass), which produces a silkier, longer-lasting, less damaging result than ironing unprepared hair. The name describes the outcome, not a different tool.
How often can I silk press without damage?
For most healthy natural hair, every 6–8 weeks is a sustainable rhythm that gives the hair recovery time between heat exposures. Monthly pressing is workable for some; weekly pressing is where cumulative damage shows up even with good technique. Pay attention to your own hair’s feedback — roughness, dullness, and straight pieces after washing mean longer breaks.
Why did my silk press puff up the next day?
The usual suspects, in order: moisture got in overnight (no wrap, cotton pillowcase, steamy bathroom), the hair wasn’t 100% dry before ironing (residual internal moisture escapes as the hair cools), sections were too thick (the interior never got fully straight), or high humidity. The fix is almost always in the prep and the nighttime wrap, not in pressing hotter.
Can I work out with a silk press?
You can, with a system: tie hair up and off the neck, wear a sweat-wicking headband to protect the hairline, and cool-blow-dry the roots afterward to re-smooth sweat-dampened sections. Heavy daily sweating will shorten any press’s life — plan press timing around your training schedule, not the other way around.
Is a silk press the same as a keratin treatment?
No. A silk press is pure heat styling with no chemicals — it washes out completely. A keratin treatment chemically coats and seals the hair (many formulas release formaldehyde when heated) and lasts months. They solve different problems: a silk press is a temporary style; keratin is a semi-permanent chemical commitment with its own safety considerations.
The Honest Bottom Line
A silk press on natural hair is one of the most satisfying styles you can do at home — when the prep is respected. Clarify, condition, get the hair bone-dry, protect it, work small sections, use the lowest effective temperature, and wrap it at night. Do that, and you get two weeks of sleek hair with your curls waiting intact on wash day. Skip the prep, and no product will save the outcome. Technique is the product.
New to structuring your wash days around styles like this? Our moisture guide for natural hair covers the hydration foundation every heat style should be built on.
Disclaimer: This article shares general hair-care information for educational purposes and is not medical or professional advice. Heat styling carries inherent risk; start with the lowest effective temperature and stop if you notice damage. Product categories are discussed informationally; this site uses no affiliate links.
